Free U.S. shipping on orders of $150+!

Marketplace

Artisans and designers will post here when they’re about to stock their online stores with new goodies, if they’re having a special sale, opening sign-ups for yarn clubs or releasing a pattern.

Visit the Indie Untangled blog every Friday, where we’ll list the shop updates, sales and events coming up that week. Sign up for the newsletter to have that list sent straight to your inbox.

Are you a dyer, designer or maker? Learn more about advertising on Indie Untangled.

View Posts By Tag

View Posts By Shop

Showing Twice Sheared Sheep

Hey friend!

Last week, I shared a tip about how I use an extra Melody Clip on my row counter to help me keep track of those times where I need to increase (or decrease) every 6 rows.

But right after, I had several emails from very confused friends asking, “OK Dawn, what exactly is a Melody Clip, because I searched on your website and couldn’t find it!”

So, I thought I’d create a post to explain. (Because if there’s one confused friend, I know there are more who weren’t brave enough to ask!).

Almost all of the stitch markers on our website come in two different styles.

-Infinity Ring
-Melody Ring

Our Infinity Ring stitch markers are closed loop style markers. They are my absolute FAVORITE stitch markers to have on my needles. The unique teardrop shape lets them hug close to your needles, but gives a nice little bit of wiggle room to stick your needle tip in. They glide effortlessly from needle to needle. It comes in both simple bead styles and ones with dangly charms.

Our Melody Ring stitch markers are removable stitch markers. They work for both knitting and crochet. Slide them on your needles, OR clip them on a stitch. Nothing to open and close — they’re a pressure clip, so you can just “pop” them on and off of a stitch one handed. They’re our most versatile stitch marker!

And the best thing about our Melody markers? They clip right on your chain row counter so you can keep track of multiple pattern elements at once!

Make sense?

I love both styles and keep some of each in my knitting bag at all times (you never know what you’re gonna need ????).

Several months ago, I was knitting a sweater while on our weekly Wednesday Zoom knit night.

It was a pretty simple pattern, but I was at the point where I needed to decrease every sixth row for the shaping.

I was chattering away and just mindlessly knitting (as one does) and suddenly stopped.

“Gosh darn it! I blew past that decrease row AGAIN!”

Everyone laughed because we’ve all done it, even though I try to pick REALLY simple patterns to knit on knit night. (I just can’t reliably talk and concentrate on a pattern at the same time. ????)

But Jean said something that changed my life forever.

“You just need to put a melody clip on the 6 loop of your counter so you don’t forget!”

Well, duh! That was EXACTLY what I needed!

So I dug a lovely amethyst melody stitch marker out of my tin and clipped it on my counter until I could make myself a specific “decrease” clip so there would be no doubt in my mind what that extra clip meant.

Then when I got to the studio the next day, I worked up an official set of “Increase / Decrease” clips SPECIFICALLY for my row counter.

So why am I telling you this today?

Well, because I had a new friend email me just the other day to ask if we had a solution for this very problem!

She had a pattern where she needed to increase every fourth row and just kept blowing past it. I was so happy to report that I knew that problem oh so well, and that yes, I had the perfect solution!

We have two types of these I & D reminder clips.

The small melody clip type is designed to go on your row counter. The large lobster claw type is designed to clip onto your actual knitting (or crochet) showing where the increase or decrease needs to go. Both are super helpful for those situations where you can’t devote your ENTIRE attention just to counting your rows (like all the time for me ????).

If you think these little guys might be helpful for you, too, you can find them over on the website.

Happy knitting friend!

Luv,
Dawn

Many years ago, when my kids were still small, I knit up a tiny little octopus just for fun.
But because I’m a whimsical creature, I knit him with five feet instead of eight.

My kids were immediately IN LOVE.

They took Pentapus out into the yard on adventures.
They made movies of him.
They cut reams of paper into tiny little hats and tiny swords so that Pentapus could become a pirate.

But if you asked them, I don’t think they could have told you that he was supposed to be an octopus.
They didn’t care WHAT he was.
He was just Pentapus.
And he needed to go on adventures!

Now my kids are great big teenagers and I think it’s finally time that Pentapus got to have adventures ALL OVER THE WORLD!

Please help us out by knitting your OWN Pentapus and sending us photos of his adventures in YOUR town.

Hey, hey friend! Happy Easter week!

You know that I am always looking for new opportunities to spoil you with pretty things and today is no exception!

As a mom of five kiddos, I was looking at the big box of plastic easter eggs that I have and thought, “You know what, I bet all of our internet friends would love these too!”

But I don’t want to fill them with chocolate.

I want to fill them with knitting tools!

So…

The Shaunas and I have filled up all of those Easter eggs with surprise row counters and we want to send them to you!

Here’s how to get one:
Hop on over to the website and fill up your cart with at least $50 worth of goodies. (Yes! The Surprise Box Club totally counts!)

A surprise Easter Egg stuffed with a mystery row counter worth up to $25 will magically appear in your cart!

A few lucky winners will receive a special GOLDEN Easter Egg with extra treats inside.

But don’t delay, this special offer is only good now through midnight April 8th. ????

I’ve been promising that our sock rulers will be back in stock soon after they sold out back in January and today is finally the day!!

So if you’ve been waiting, this is your official chance to go grab one of your own!

Why did they sell out so quickly the first time?
Because they’re awesome!

These little rulers let you knit socks the perfect size for any recipient. All you need is their shoe size.

Works for both top down or toe up socks.
Place the ruler with the arrow snug into the heel (or toe) of your sock and knit until you reach the line for your desired size.
Then begin working your toe (or your heel).
No math.
Just knit!
And best of all?
It rolls up nice and small to fit inside your project bag so you can take it wherever your sock knitting takes you!

Does your knitting bag need one?

It’s not too late to make 2023 a year of joy! Join us for the remaining two boxes of our Surprise Box Club

When was the last time you received a gift and were truly surprised? Surprised like someone had crawled inside your brain and pulled out the EXACT thing that would make you squeal with delight?

That’s what it’s like to be a member of Twice Sheared Sheep’s Surprise Box Club.

Join our box club as a LATE ENROLLMENT and receive a happy white box for:

June – “Pool Party” Theme for Summer
September – “Crisp Autumn Evening” for Fall
No pressure to keep up with another “make along”
Just presents!
8 Full sized products per box
Over $140 total value per box!

We’ve had a lot of new friends join our community recently and that means we’ve had a lot of awesome new friends asking questions about our row counters.

I’ve been using them for YEARS and sometimes take for granted that you don’t all just live inside my brain where all the answers live. (I mean, that would be weird. Let’s not do that.)

So today I’m answering all the questions!
Because if one person was brave enough to ask I know that there are others who are wondering the same thing.

Q: How exactly do I use a row counter?

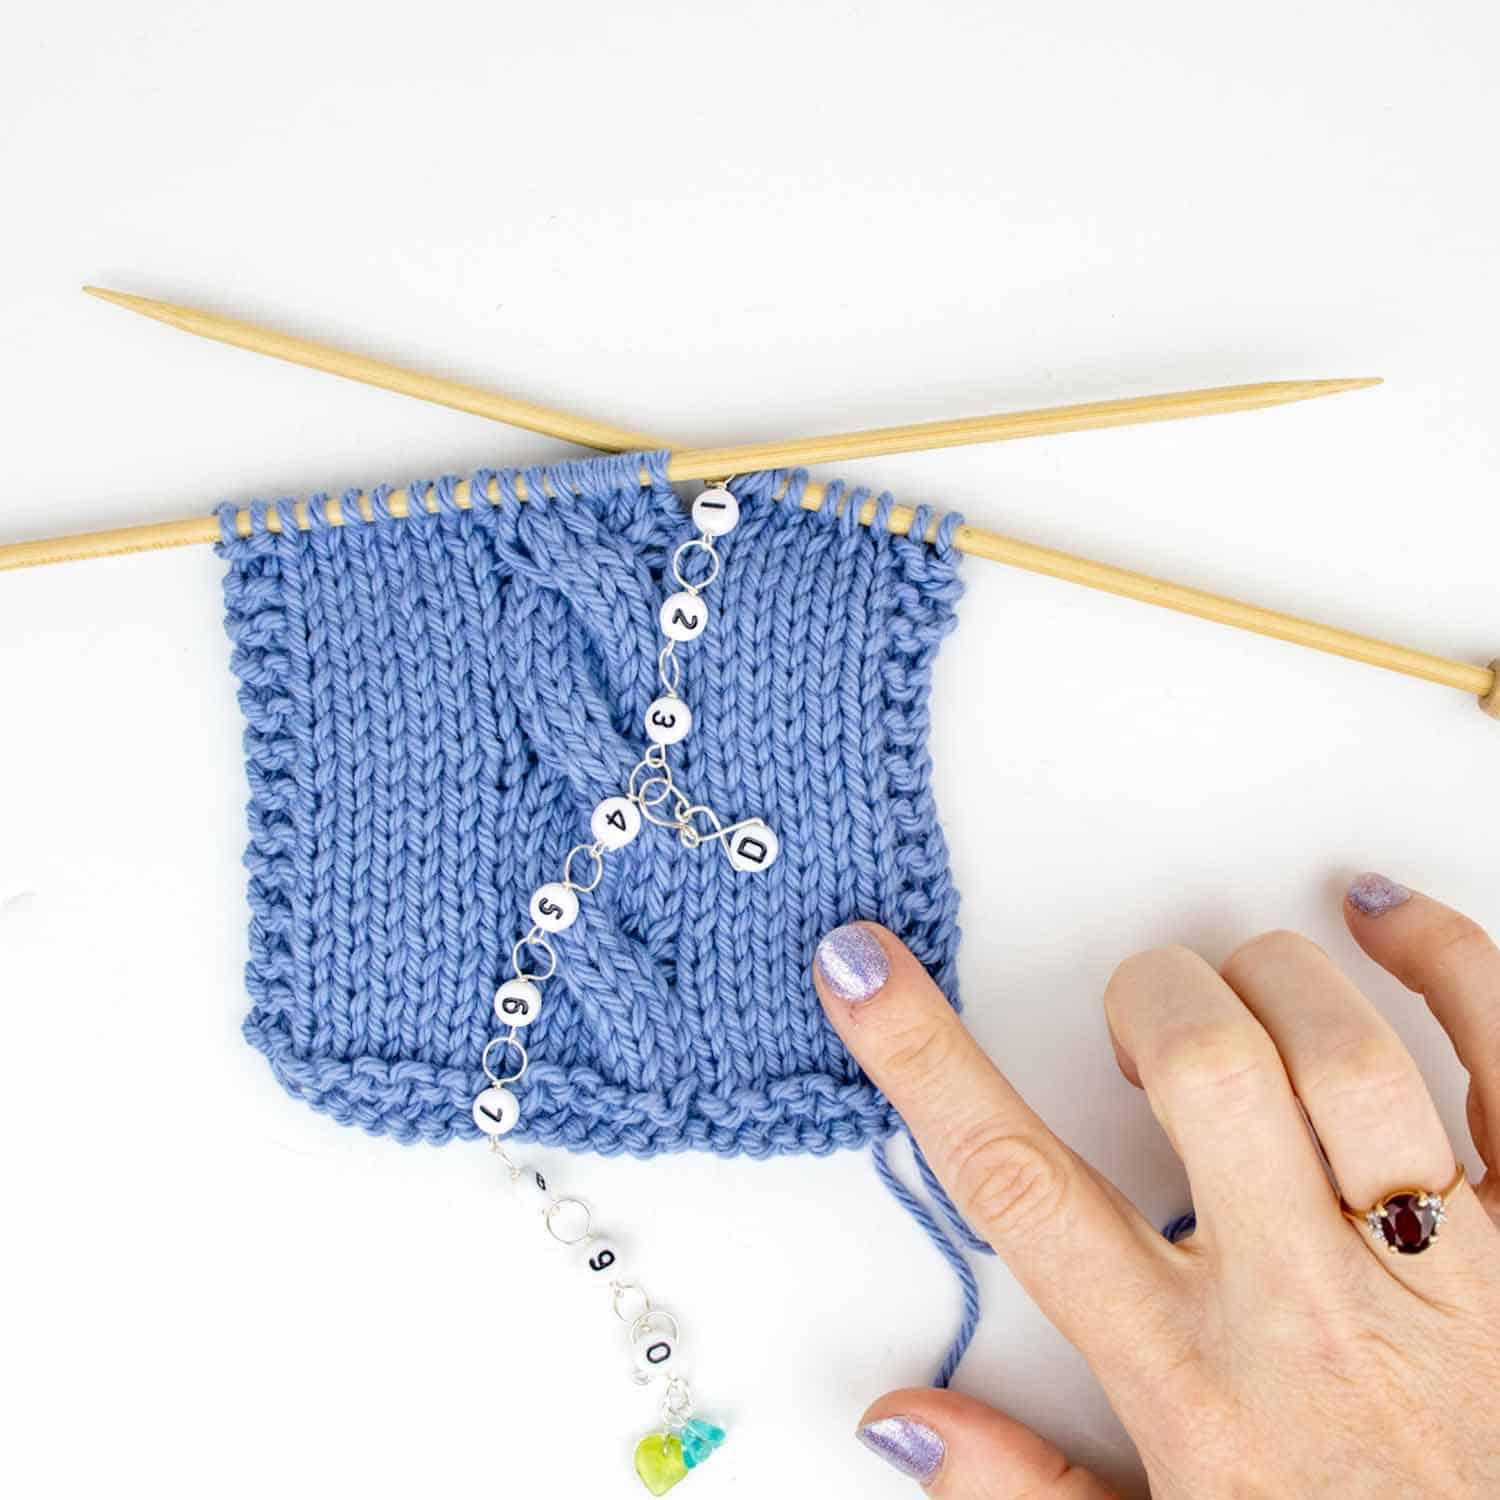
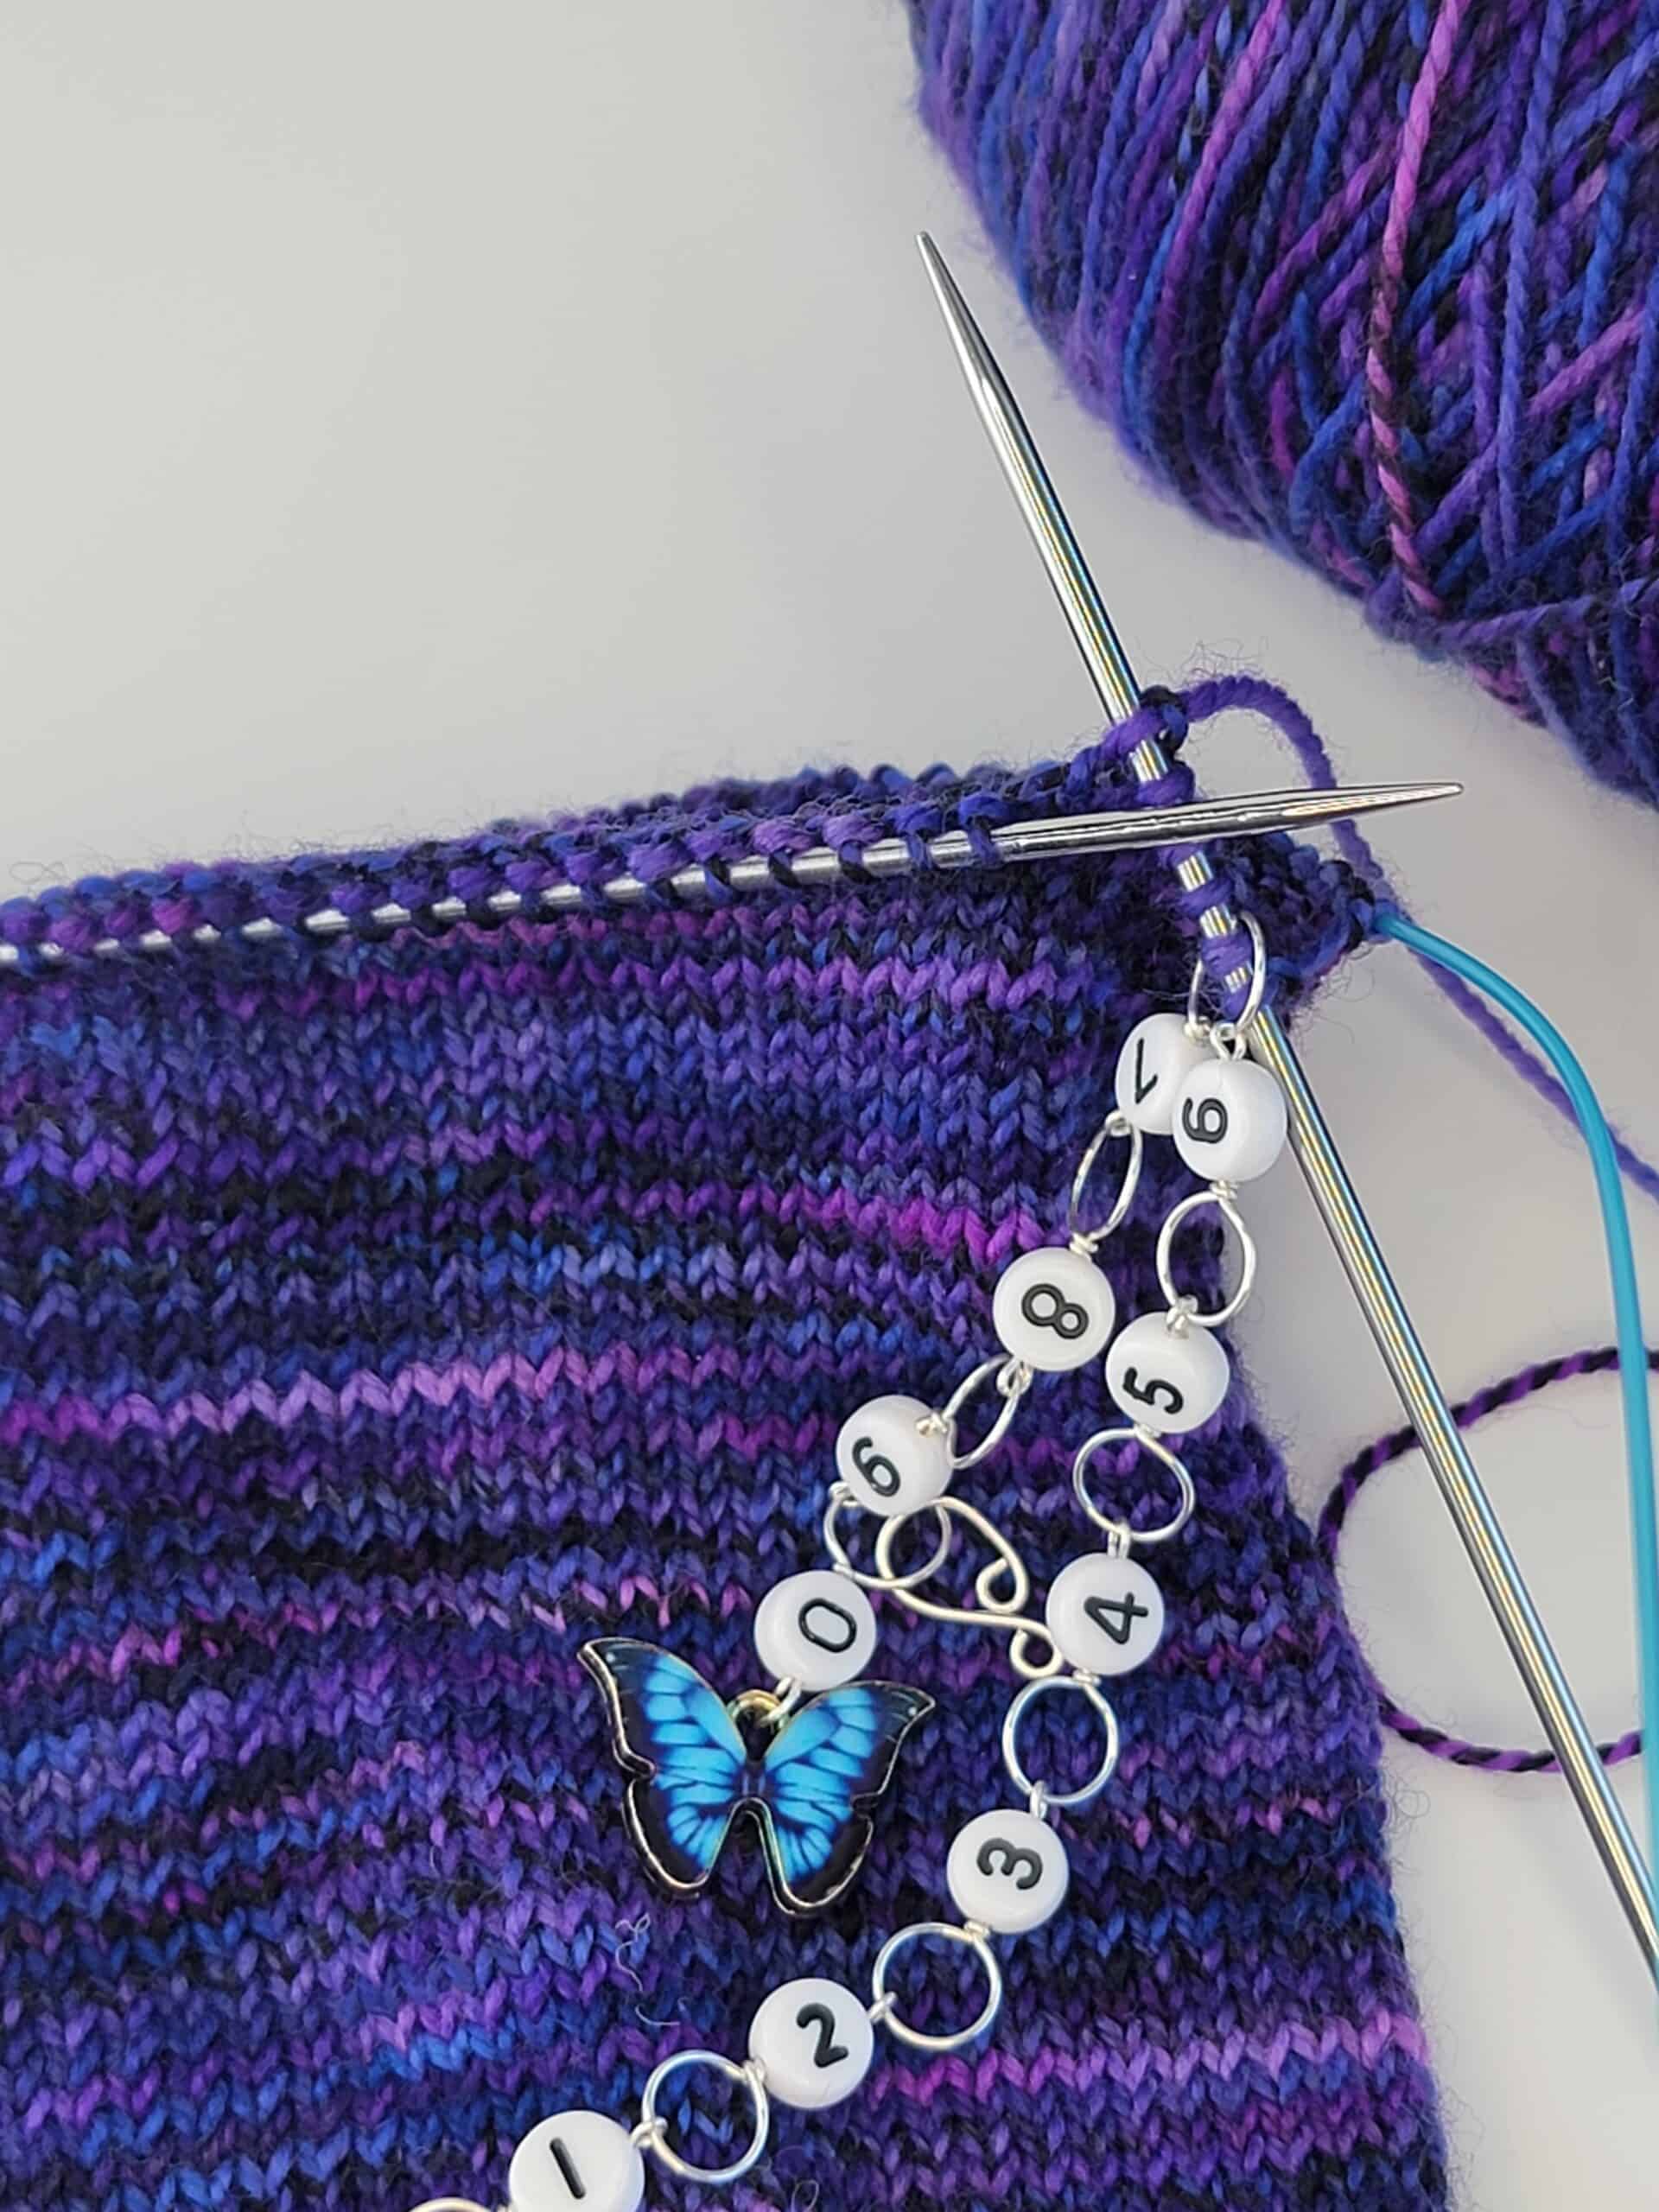
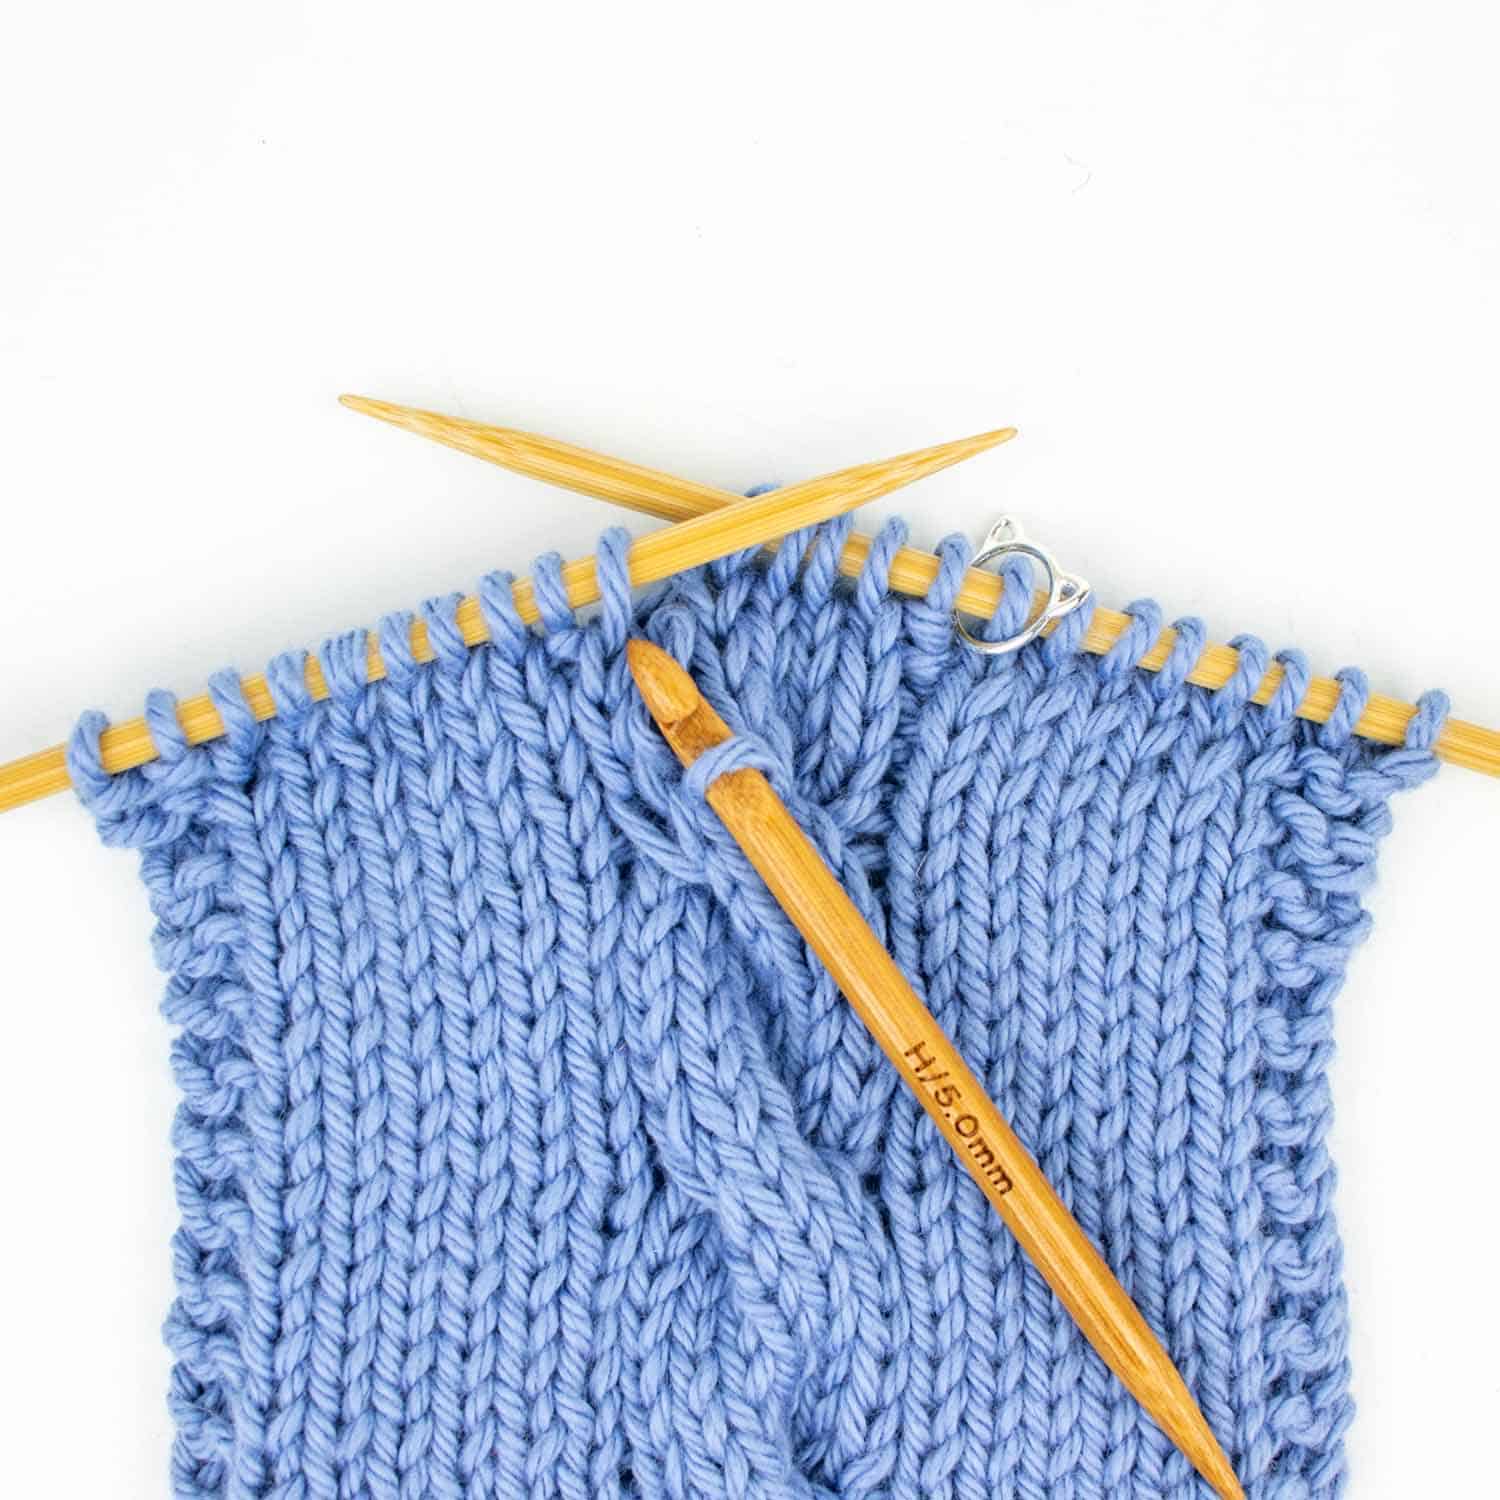
A: Simply replace any regular stitch marker with your chain counter and start knitting!

When you come back to the row counter, move it to the next loop in the chain as you naturally pass it from needle to needle.

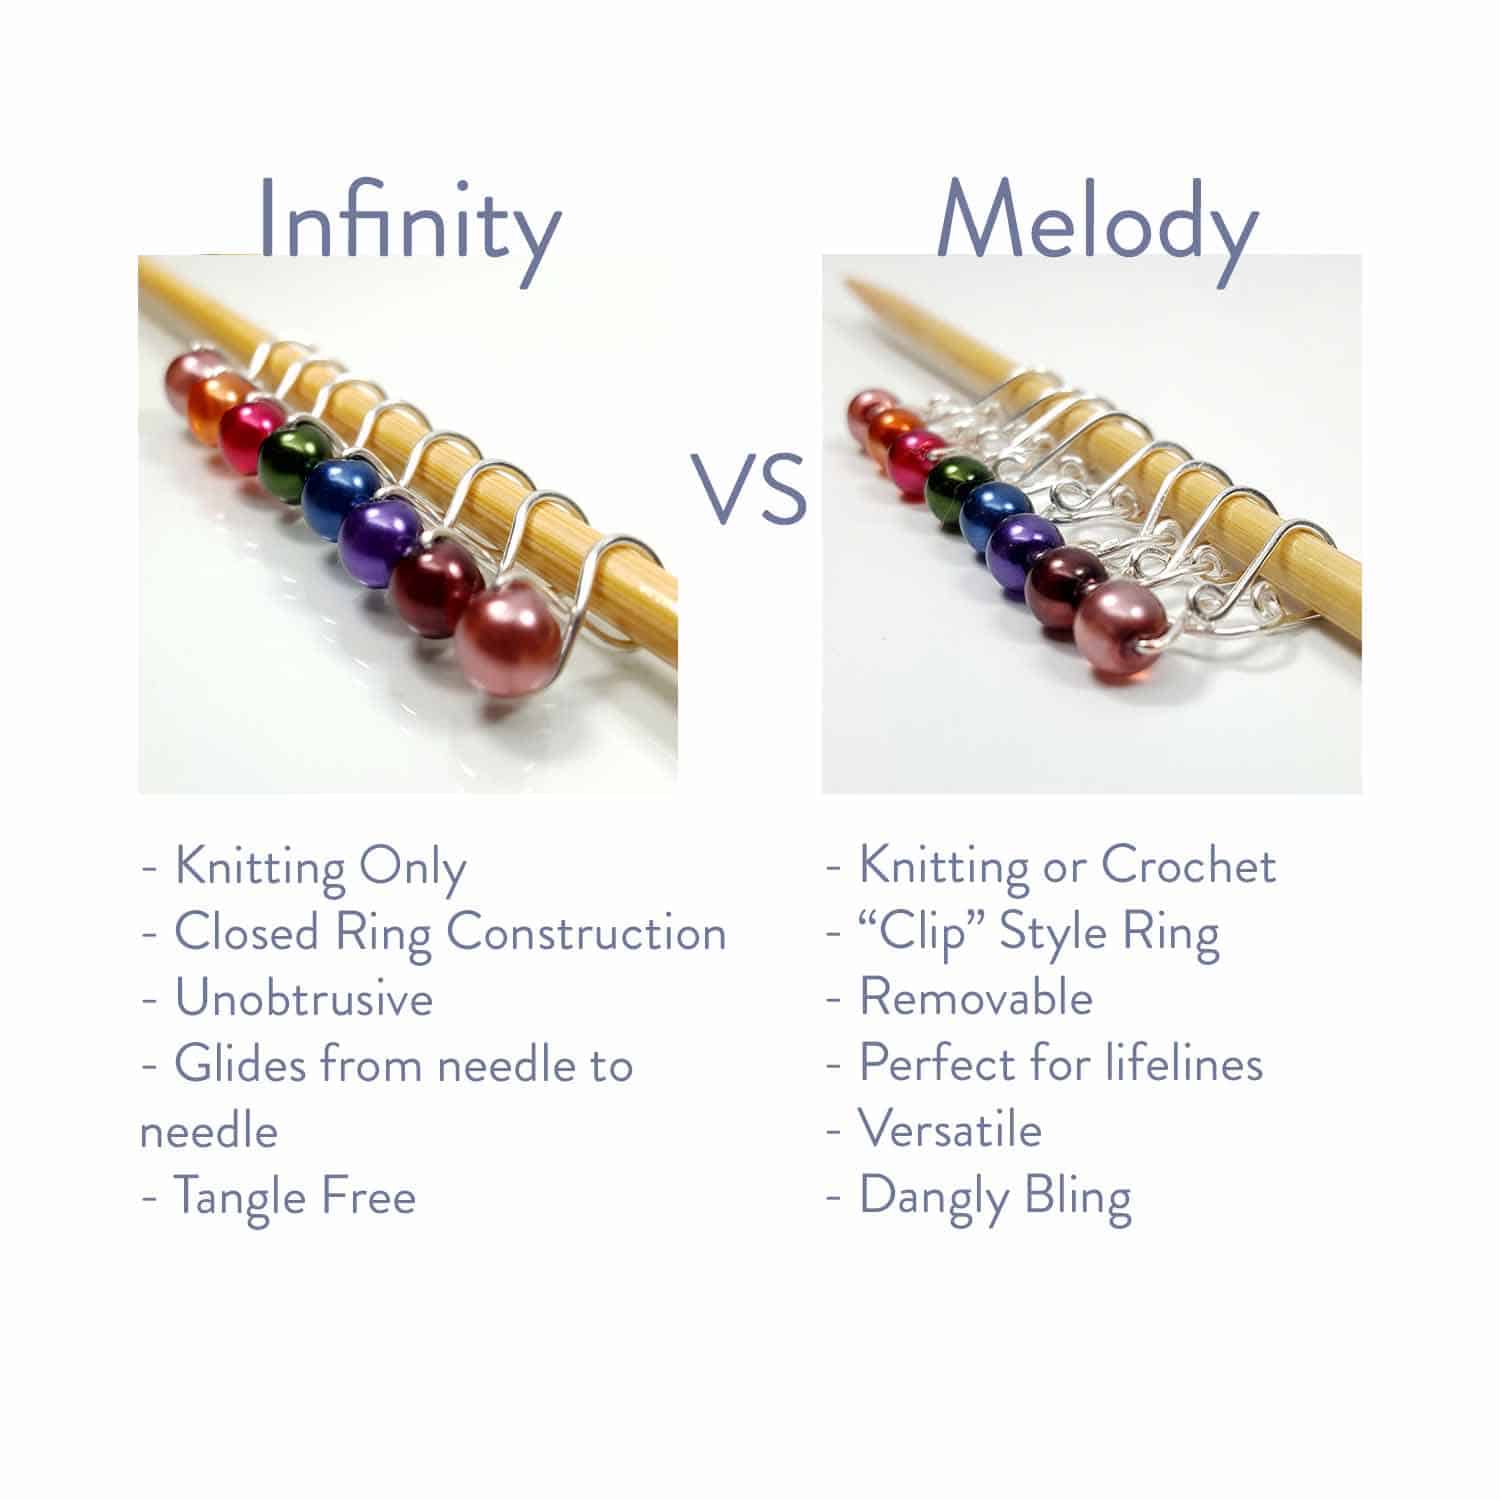
Once you’ve worked all the way through the chain, use the attached melody clip to mark your 10s place (ie, the 1 in 10) and start the chain again!

Q: There are only 10 loops on the chain. What do I do when I need to count more than 10 rows?

A: Every row counter comes with a little melody clip attached to the 0 loop. When you have worked your way through the chain and need to start it over again at 1, it’s time to use the melody clip!

Move that little clip to the 1 loop to designate that you have now completed the chain one time. Since the chain is 10 rows long, it also marks the 10s place in your count (i.e., the 2 in 21). Repeat this every time you finish the chain, marking the 10s place and the number of times you have completed the chain.

When you need to know what row you’re on, you can just look at your counter.

If the clip is on the 2, and the chain is on your needles on the 3 loop, then you are on row 23!
Make sense?

Q: How do I use the row counter when I knit flat?

A: Our row counters are essentially a fancy stitch marker and can replace any regular stitch marker on your needles. I like to put mine at least two stitches in on the right side (or right after the edging stitches) when I’m knitting flat.

This means that you’ll move the counter to the next number at the beginning of right side rows and won’t move it again until almost the end of wrong side rows.

It still keeps a 100% accurate count, but some people really like the reassurance of being able to move their counter at the beginning of every row.

If that’s you, then our Odd / Even row counter sets are what you’re looking for!

We’ve divided the chain up into odd rows and even rows so that you can put one chain at each end of your work. Move the chain to the next number at the beginning of every row, and slip the chain at the end of the row without changing numbers (or if you like to move at the end, reverse that).

Q: Won’t my row counter get knitted into my work and get stuck as I knit?

A: Nope! Your row counter is just a fancy stitch marker and should float along your needles between stitches just like any other stitch marker. It shouldn’t ever become permanently attached to your knitting.

The chain is dangly, though, and if you let it hang with one half on each side of your work, it can become trapped under the working thread as it passes from stitch to stitch.

To prevent this, always make sure that both sides of the chain are on the OPPOSITE side of the work from your working yarn when you pass the chain from one needle to the other (in the front of the work when knitting and in the back of the work when purling).

Q: Wow, there are a lot of Row Counter options… What’s the difference them all? I’m so confused!!

A: I completely understand! It’s kind of a lot.

Here’s the rundown so you can keep everything straight.

Original Row Counter – Our all-purpose, works-for-everything chain row counter. This counts up to 110 rounds, rows, or pattern repeats. It works for flat knitting, circular knitting, and most other forms of knitting you can think of.

Circle Row Counter – Works exactly like our original chain counter. The only difference is that we have connected the 0 and 1 together so that the chain now hangs half as long from your needles. It also allows you to start on either the 0 or the 1 loop depending on which your brain likes best.

It is absolutely a matter of personal preference on whether you will like the circle counter or the original counter better. It’s totally up to you!

Odd / Even Row Counter Set – For flat knitting.

When knitting flat with an original or circle chain counter, you move the counter at the beginning of right side rows and not again until almost the end of wrong side rows.

Some people prefer to be able to move a counter at the beginning (or end) of every row, so we created the Odd / Even Counters just for you!

We have divided the original chain counter into an odd number half and an even number half. Just place one half near the beginning of your row and the other half near the end, allowing you to move a counter every row (and make your brain happy!)

Shortie Row Counters – These little guys are designed especially for patterns with short pattern repeats where you don’t need a full chain counter.

Each counter only has loops 1-5 and is half the length of our regular counters. Meaning that there is less to hang from your needles and less to potentially get in your way. ????

Increase / Decrease Counters – These are for those special circumstances where you need to work an increase or decrease every other row (such as sock toes, or sweater darts, or asymmetrical triangle shawls). Katie is convinced that they are going to change the world.

Slip it on your needle just before where you need to work your increase (or decrease) When you come to it, check what loop you’re on (I for increase, D for decrease, K for knit). That’s what you need to do this round. Slip the counter to the next loop and do the thing that you need to do (increase, decrease, or knit). This should make sure that you increase every other row, every single time. ????

Whew! I think that’s everything.

Did I miss something? If you still have a question that I haven’t answered, just send an email! I’m always here to help. ????

Every few months, I ask the members of our Knit Club what knitting things they are dreaming of.

I do this because honestly, ya’ll are much smarter than I am. And I can’t tell you how often someone will ask for something and I will start using it and say, “Where has this been all my life?!”

This was absolutely the case for our Cable Locks.

One of our wonderful Knit Club members asked for point protectors that would ACTUALLY stay on the needles and do their job of keeping the stitches safe.

At the time I thought, “I don’t even use point protectors. Why not just pull your needles through to the cords and call it good?”

But I know that everyone knits differently and I always want to be able to provide tools that make EVERYONE’s knitting life easier. So, I started doing some experimenting and testing and released two new point protector options: Tip Ties and Cable Locks.

I patted myself on the back and thought, “Those are wonderful. They’ll be exactly what she needs.” Then I went about my business and never added them to my own knitting bag.

After all, I don’t use point protectors…

That is, I didn’t use point protectors until I cast on a shawl at Christmas time…

I knew this shawl was going to get bigger and bigger, so I planned ahead and used one of my longer circular needles. But this meant that I had a LOT of extra cord hanging around, and as I knit those long rows, those hundreds of stitches would relax themselves all down the cord.

I found myself CONSTANTLY having to scrunch them back up together, close to my left needle tip so that they were ready to be knitted.

I guess maybe I was a little rough about it because I began to notice that my yarn was catching just a touch on the join between the cord and the needle tip. No problem, I shoved the cord back in a little tighter and carried on.

But it kept happening (which was REALLY annoying) and in my irritation at having to scrunch the stitches again, I realized that each time I scrunched those stitches back up towards my needle, I was unconsciously yanking on the cord as I squished them up. That little yank was pulling the cord out of the tip just a tiny little bit causing a little drag on the stitches, and honestly, probably ruining my circular needle. ????

That’s when I decided I needed a cable lock on my needle.

Not to keep the stitches on the needle (I had plenty of extra cord), but to help me keep them all so close to my needle so I could stop yanking on it. ????

But of course, these little guys don’t just keep stitches close to the needle.

If you put one at each end, they also keep stitches from accidentally sliding off while sitting in your knitting bag.

Or, even act as stops if you need to steal the needle tips for another project.

Last time, these sold out in 24 hours! So grab a set of these versatile tools while you have the chance. ????